Cleaning a vape tank for the first time can seem daunting. Many users feel uncertain about the process. It is essential to understand the steps involved in maintaining your device. Knowing how to clean a vape tank for the first time is crucial for optimal performance.
A clean tank ensures better flavor and vapor quality. Over time, residue can build up, affecting your experience. If not addressed, this buildup can lead to unpleasant tastes and even device malfunctions. Taking the time to learn the proper cleaning techniques can enhance your vaping experience significantly.
Many articles offer various suggestions on cleaning methods. Some users may struggle or overlook details in the process. This guide aims to provide clear, straightforward instructions. With the right approach, you can tackle this task confidently and effectively. Don't hesitate to seek out expert advice if needed; learning is part of the journey.
Cleaning a vape tank can feel daunting, especially for new users. Understanding its components is crucial before diving into the cleaning process. A vape tank typically includes the tank body, coil, and mouthpiece. Each part, if neglected, can affect your overall vaping experience. Dust and residue can accumulate, leading to poor flavor and reduced performance.
The tank body holds the e-liquid. Over time, e-liquid can leave sticky residues. Cleaning it requires precise attention. Coil maintenance is essential as well. A worn-out coil can produce burnt flavors. Cleaning the mouthpiece ensures hygiene, especially if shared. A clean mouthpiece enhances the overall experience.
Many users overlook these details. Immediate satisfaction can skew their diligence. It’s essential to regularly inspect and clean these components to maintain the desired flavor profile. A neglected tank might seem fine initially, but the effects will show over time. Taking a moment to address these areas can lead to a more enjoyable experience.
Cleaning a vape tank effectively starts with gathering the right supplies. The essential items include warm water, a cleaning solution, and a soft cloth. A dedicated brush or cotton swabs can also be helpful to reach intricate parts. According to industry surveys, over 60% of vape users neglect regular maintenance. This often leads to poor flavor and device malfunctions.
When selecting a cleaning solution, avoid harsh chemicals. Opt for mild ingredients that won’t damage the tank material. Some experts recommend isopropyl alcohol for its effectiveness in removing residue. It’s vital to ensure that all components are compatible with the cleaning agent used. On average, a well-maintained tank can enhance the vaping experience significantly, providing clearer flavors.
Many users underestimate the time needed for thorough cleaning. A quick rinse isn’t sufficient to remove all buildups. Aim for at least 20 minutes for optimal results. Regular maintenance not only prolongs the life of your vape tank but also improves performance. Understand that every device may require different cleaning intervals based on usage frequency and juice type.
Disassembling your vape tank can seem daunting at first. However, a step-by-step approach can simplify the process. Begin by ensuring all components are on a clean surface. Gather a small bowl for parts and a few cleaning supplies. Use distilled water to avoid mineral buildup. Manufacturers recommend cleaning every few weeks.
Start by removing the drip tip and separating the glass tank from the base. Rinse each piece with warm water. Many vapers overlook the importance of cleaning the coil. Studies show that buildup on the coil can lead to less flavor and a burnt taste. Use a cotton swab dipped in isopropyl alcohol to remove residue gently. This is effective but may not be perfect.
After rinsing and drying, reassemble the tank carefully. Always double-check that the seals are intact to prevent leaks. It’s essential to keep track of the number of times you disassemble your tank. Overuse can wear rubber seals and impact the device's performance. Regular maintenance not only enhances flavor but extends the life of your vape tank.
Cleaning a vape tank can be an intricate task, especially for beginners. When it comes to effective cleaning, soaking is one of the most fundamental methods. Fill a small bowl with warm water and add a mild soap. Submerge the tank parts after disassembling them. Let them soak for 15 to 30 minutes. This helps loosen any residue inside.
After soaking, scrubbing is the next step. Use a soft brush to reach tight spaces. Pay special attention to the coil area, as it often collects hardened buildup. There may be stubborn spots requiring extra effort. Rinse thoroughly under running water to remove soap residue. Ensure all components are completely clean. This process takes patience; rushing may lead to incomplete cleaning.
Rinsing is crucial after soaking and scrubbing. Use clean water to ensure no soap or debris remains. Sometimes, a second round of rinsing is necessary. Once rinsed, allow the parts to air dry completely. This prevents unwanted moisture retention. Remember, every vape tank is different. Adapt your methods as needed. Even with care, results may vary. Embrace the learning process; each cleaning improves your technique.
After cleaning your vape tank, reassembling it properly is crucial. Begin by laying out all the cleaned parts on a clean, dry surface. Make sure each piece is completely dry to avoid any malfunction. Carefully reinsert the wicking material into the coil, ensuring it's placed snugly. Many overlook this step, leading to poor vapor production later. Take a moment to check for any visible damage on the seals. They play a significant role in preventing leaks.
Once everything is in place, it’s time for testing. Fill the tank with your preferred e-liquid, but do not overfill. Leave some space for air to prevent flooding. Allow the tank to sit for a few minutes. This enables the wicking material to soak up the e-liquid adequately. After that, take a few gentle puffs without firing the device. This action helps to confirm that the assembly is sound.
Keep an eye out for leaks during this testing phase. A small leak can indicate that parts are not sealed correctly. If you notice any issues, disassemble and reassess your work. Reflect on what adjustments might be necessary. This process is not just about cleaning; it’s about ensuring a reliable vaping experience.
: A vape tank typically includes the tank body, coil, and mouthpiece. Each part needs attention for a good experience.
It's recommended to clean your vape tank every few weeks. Regular cleaning helps maintain flavor and performance.
A worn-out coil can produce burnt flavors. Cleaning the coil reduces buildup that affects the taste of the vapor.
Use distilled water to rinse the tank. Isopropyl alcohol on a cotton swab can help clean residue on the coil.
After assembling, fill the tank without overfilling. Take gentle puffs and look for leaks during the testing phase.
A dirty mouthpiece can affect hygiene. It’s especially important if the device is shared with others.
Regularly inspect and clean all parts. Keeping track of disassemblies helps maintain seal integrity.
Yes, warm water helps remove sticky residues more effectively than cold water. Just ensure to dry everything completely.
If you notice a leak, disassemble your tank and reassess your work. Reflect on any possible adjustments needed for a better fit.
Yes, overuse can wear rubber seals, affecting performance. It's important to balance maintenance with careful reassembly.
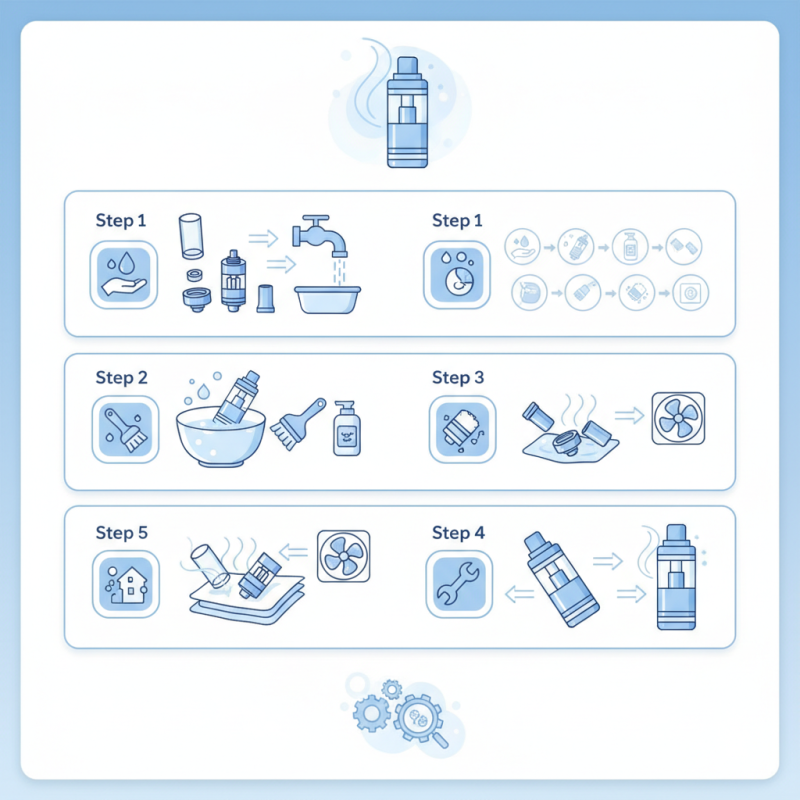
Cleaning a vape tank for the first time can seem daunting, but with the right approach, it can be a straightforward process. First, it's essential to understand the components of your vape tank to ensure effective cleaning. Gather all necessary supplies, such as warm water, a soft cloth, and a brush for detailed cleaning.
Next, follow a step-by-step guide to disassemble your vape tank carefully. Once disassembled, employ thorough cleaning methods, including soaking the parts, scrubbing any residue, and rinsing to remove any remaining particles. Finally, reassemble the tank and test it to ensure it's functioning correctly. By following these steps, you'll learn how to clean a vape tank for the first time effectively, maintaining its performance and extending its lifespan.